GPG를 활용하여 Git에 commit에 서명하는 방법을 공유합니다.
SourceTree / GitKraken에서 commit을 진행 할 때에도, signed commit을 생성하는 방법도 서술합니다.
해당 포스팅은 macOS 기준으로 서술되었습니다.
Signed Commit
서명된 Commit의 필요성
Git에는, commit / push 할 때, 해당 commit을 남긴 author를 지정 할 수 있습니다.
Github를 사용하는 경우에는 일반적으로 본인이 사용하고 있는 github계정의 email, username으로 author를 특정합니다.
1 | |
하지만, git commit의 author는 변경되기 매우 쉽습니다.
1 | |
위처럼 변경한 뒤, Github에 commit / push를 할 시 아래처럼 author가 변경되어 있는 것을 확인 할 수 있습니다.

따라서 여러명이 같은 저장소에서 개발을 할 시, git commit의 author를 누군가 조작하여 본인이 한 커밋이 아님에도 본인의 정보로 commit 이력이 남아 있을 수 있습니다.
이를 방지하기 위해, 누군가 한 commit이 정말 본인이 한 commit인지를 확인 할 수 있도록 서명된 commit을 사용합니다.
이를 위해 GPG를 활용하여 본인의 commit에 서명하는 방법을 공유합니다.
Using GPG
Check GPG Key
Git commit에 서명하는 방법은 여러가지가 있지만 ( GPG / S/MIME ) GPG를 활용하여 서명 해 보도록 하겠습니다.
먼저, 본인이 발급받은 gpg key가 있는지 확인합니다.
1 | |
gpg 키가 위 명령어를 통해 아래와 같이 표출된다면, Check GPG keys부터 보시면 됩니다.
1 |
|
아래와 같이 나온다면 gpg 설치부터 진행 합니다.
1 | |
GPG 설치
macOS의 경우, homebrew를 활용하여 gpg를 쉽게 다운로드 받을 수 있습니다.
1 | |
GPG Key generate
본인이 설치 한, 이미 설치되어 있는 gpg 버전을 확인 해 줍니다.
1 | |
gpg 버전이 2.17 버전보다 낮은 경우엔 아래의 명령어로 gpg key를 발급 해 줍니다.
1 | |
gpg 버전이 2.17 이상인 경우엔 아래의 명령어로 gpg key를 발급 해 줍니다. ( 세부 선택 항목 참고 : Git Docs )
한가지 주의 할 점은 Github에서 커밋에 서명을 하기 위해선, key size가 4096 이상이어야 합니다. ( 출처 : Git Docs 의 5번 항목 )
1 | |
Check GPG keys
발급된 GPG Key를 확인 해 줍니다.
1 |
|
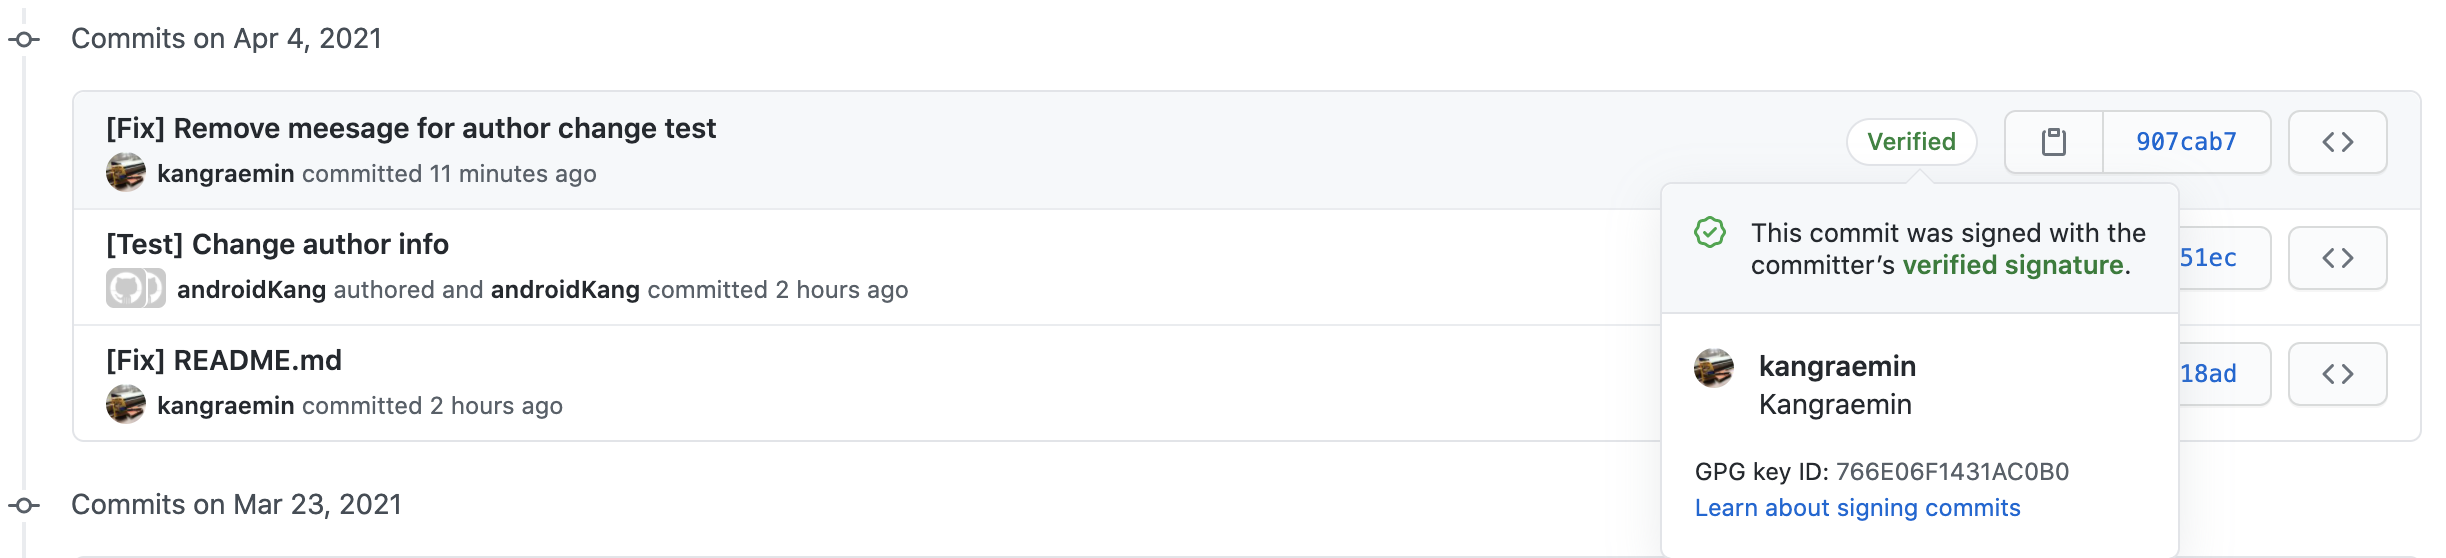
위 명령어를 입력 해 보면, sec 항목의 rsa4096 뒤에 적힌 766E06F1431AC0B0 값이 GPG_key_ID 입니다.
해당 GPG_key_ID 값을 가지고, 아래의 명령어를 입력하여 공개 키의 ascii armored version을 확인합니다.
1 | |
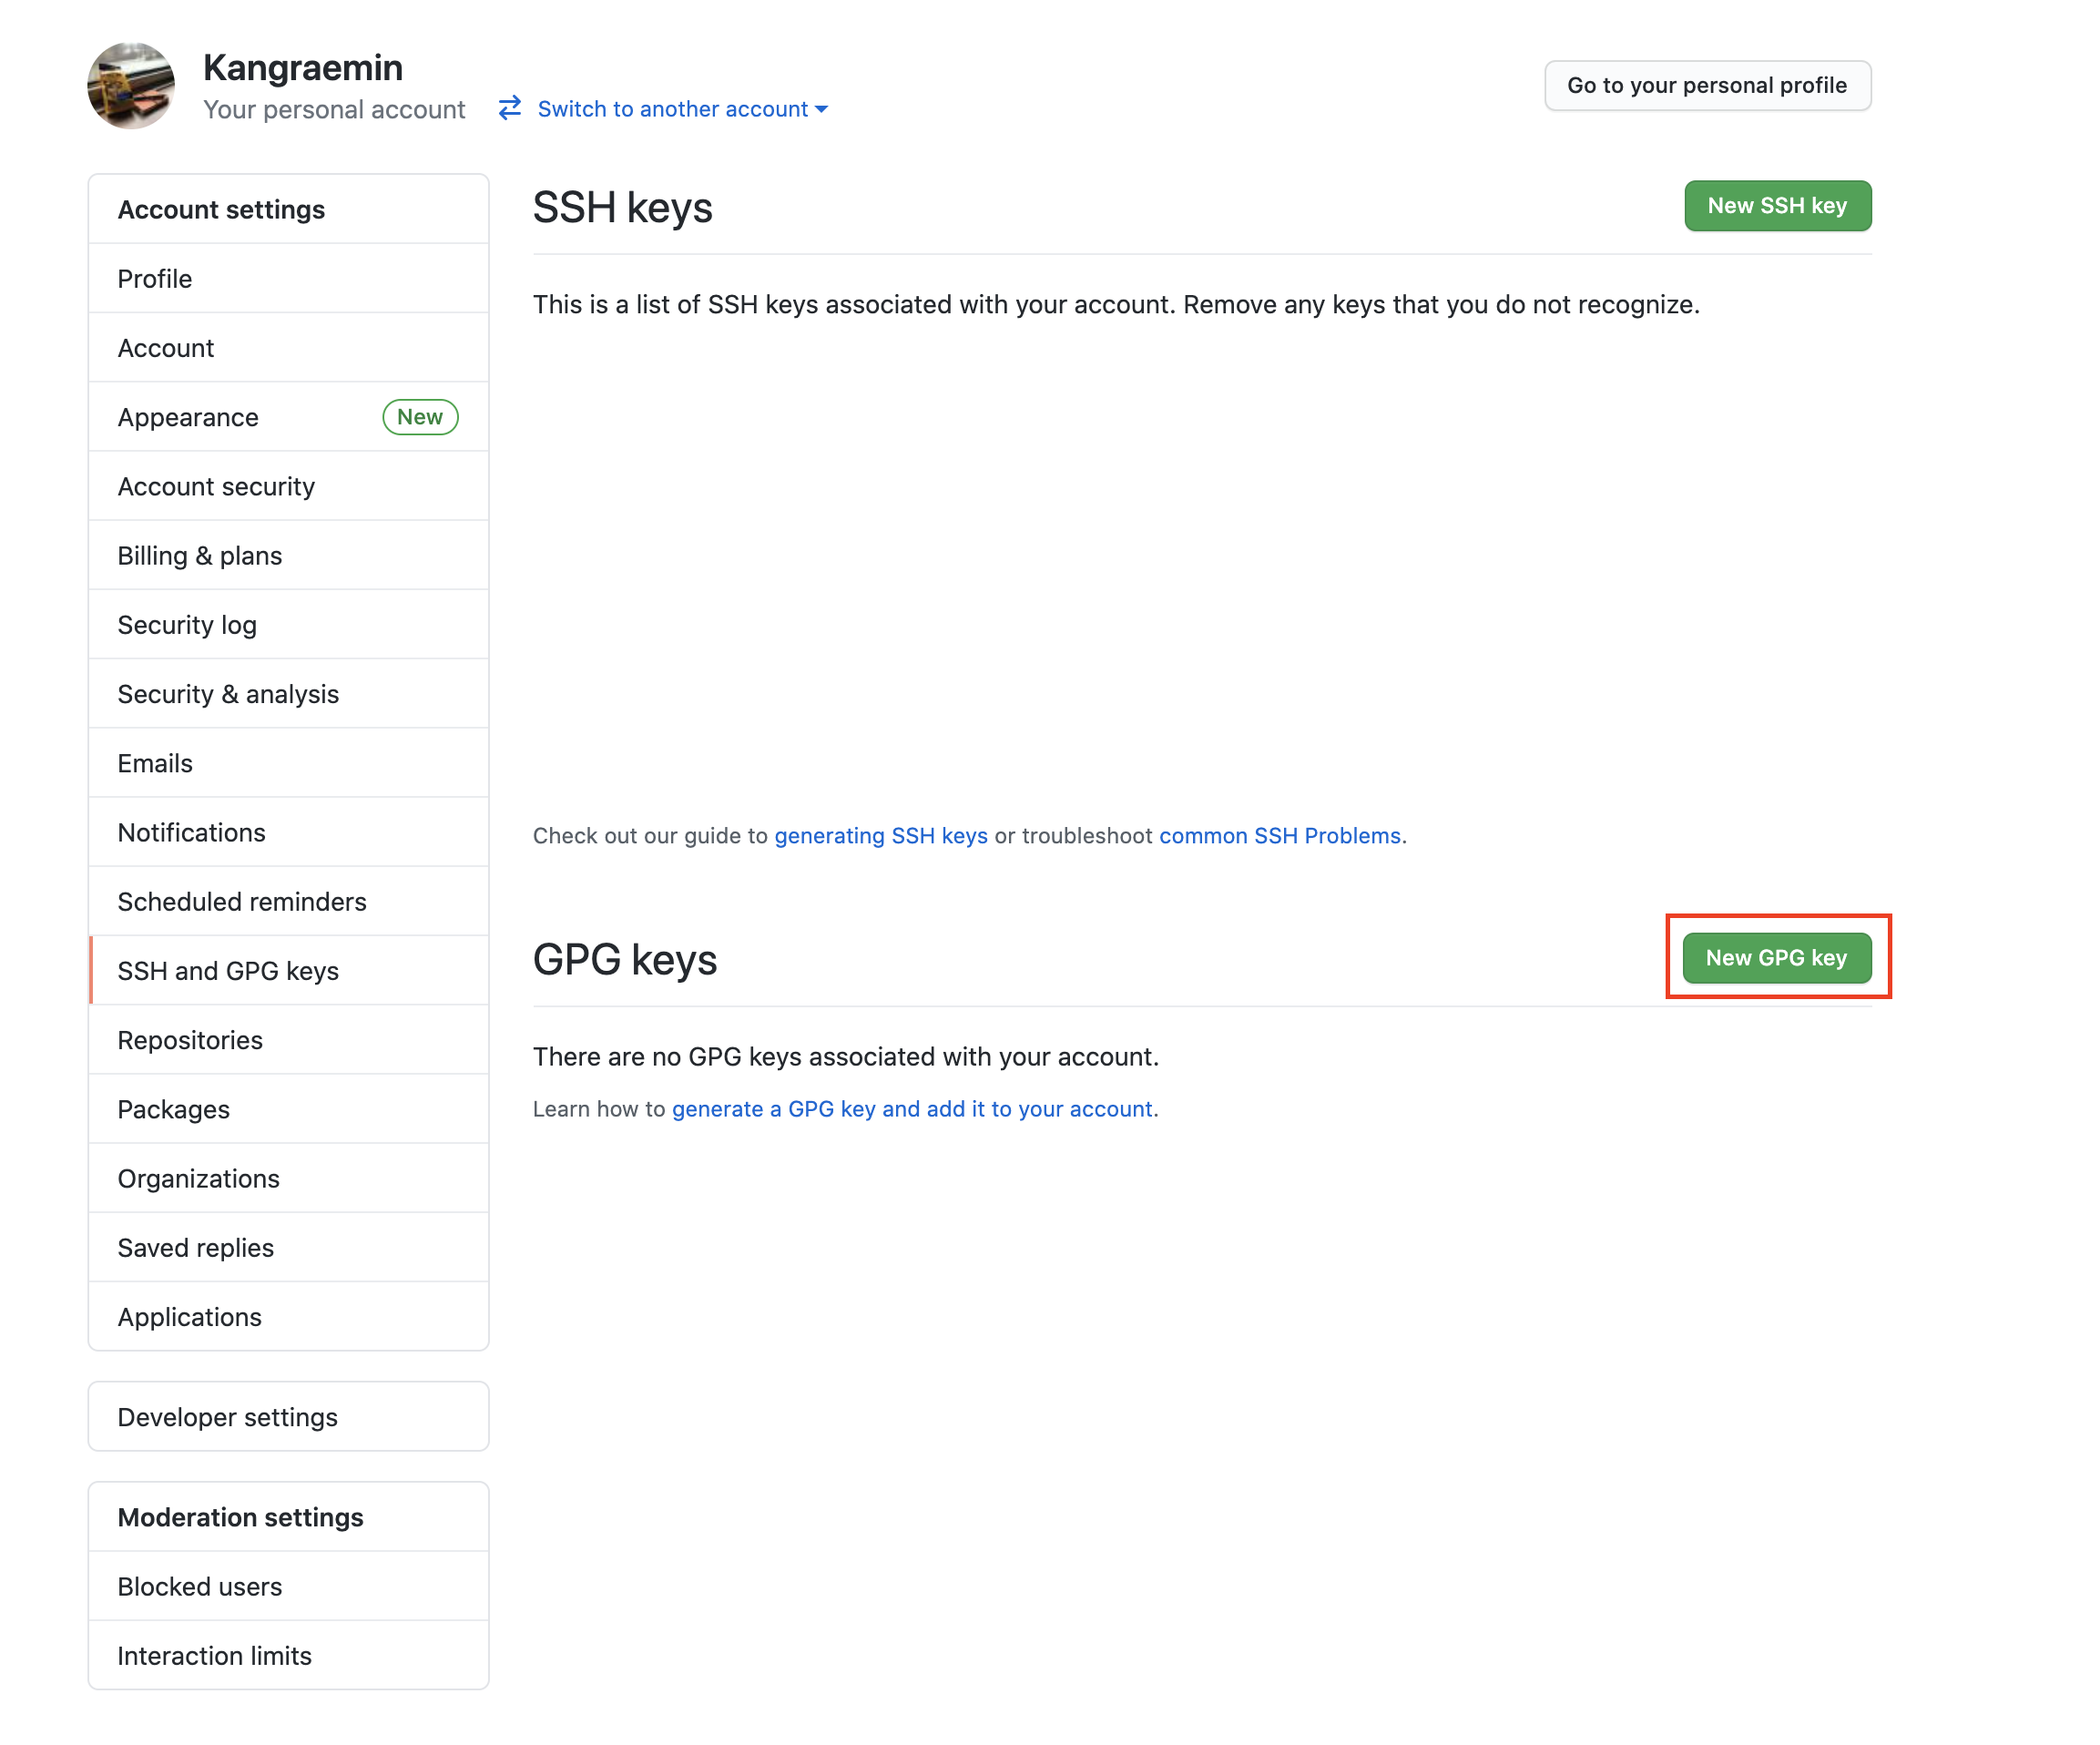
Github GPG key 등록
위에서 생성한 public key를 Github에 등록하여야 합니다.
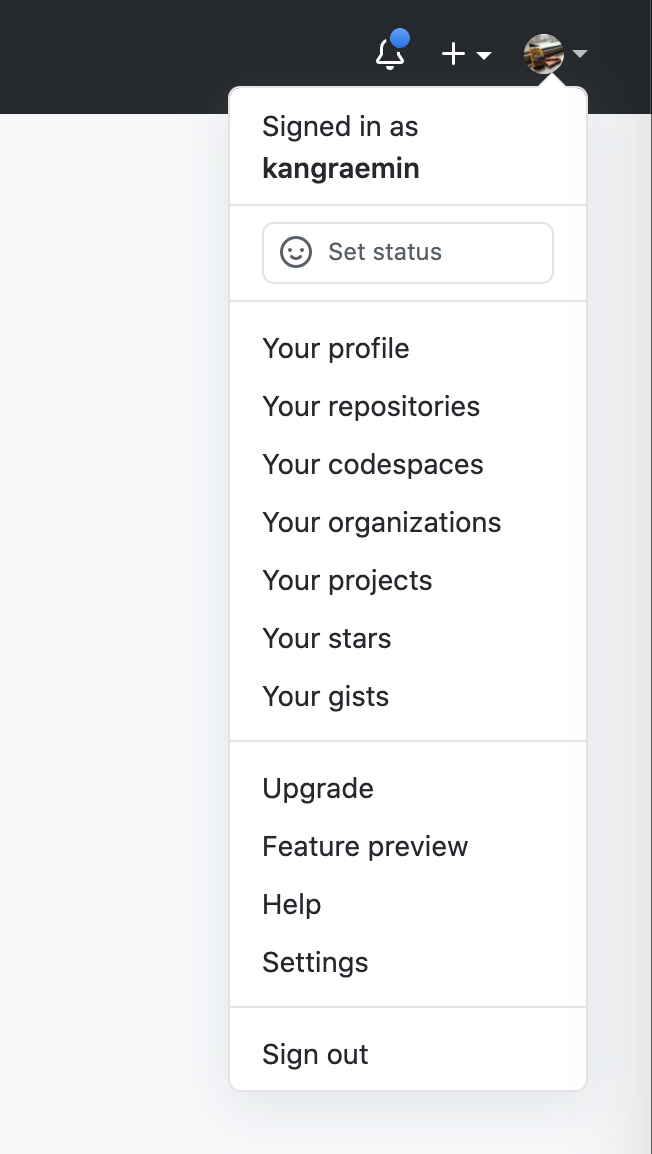
Git 계정의 settings로 이동합니다.
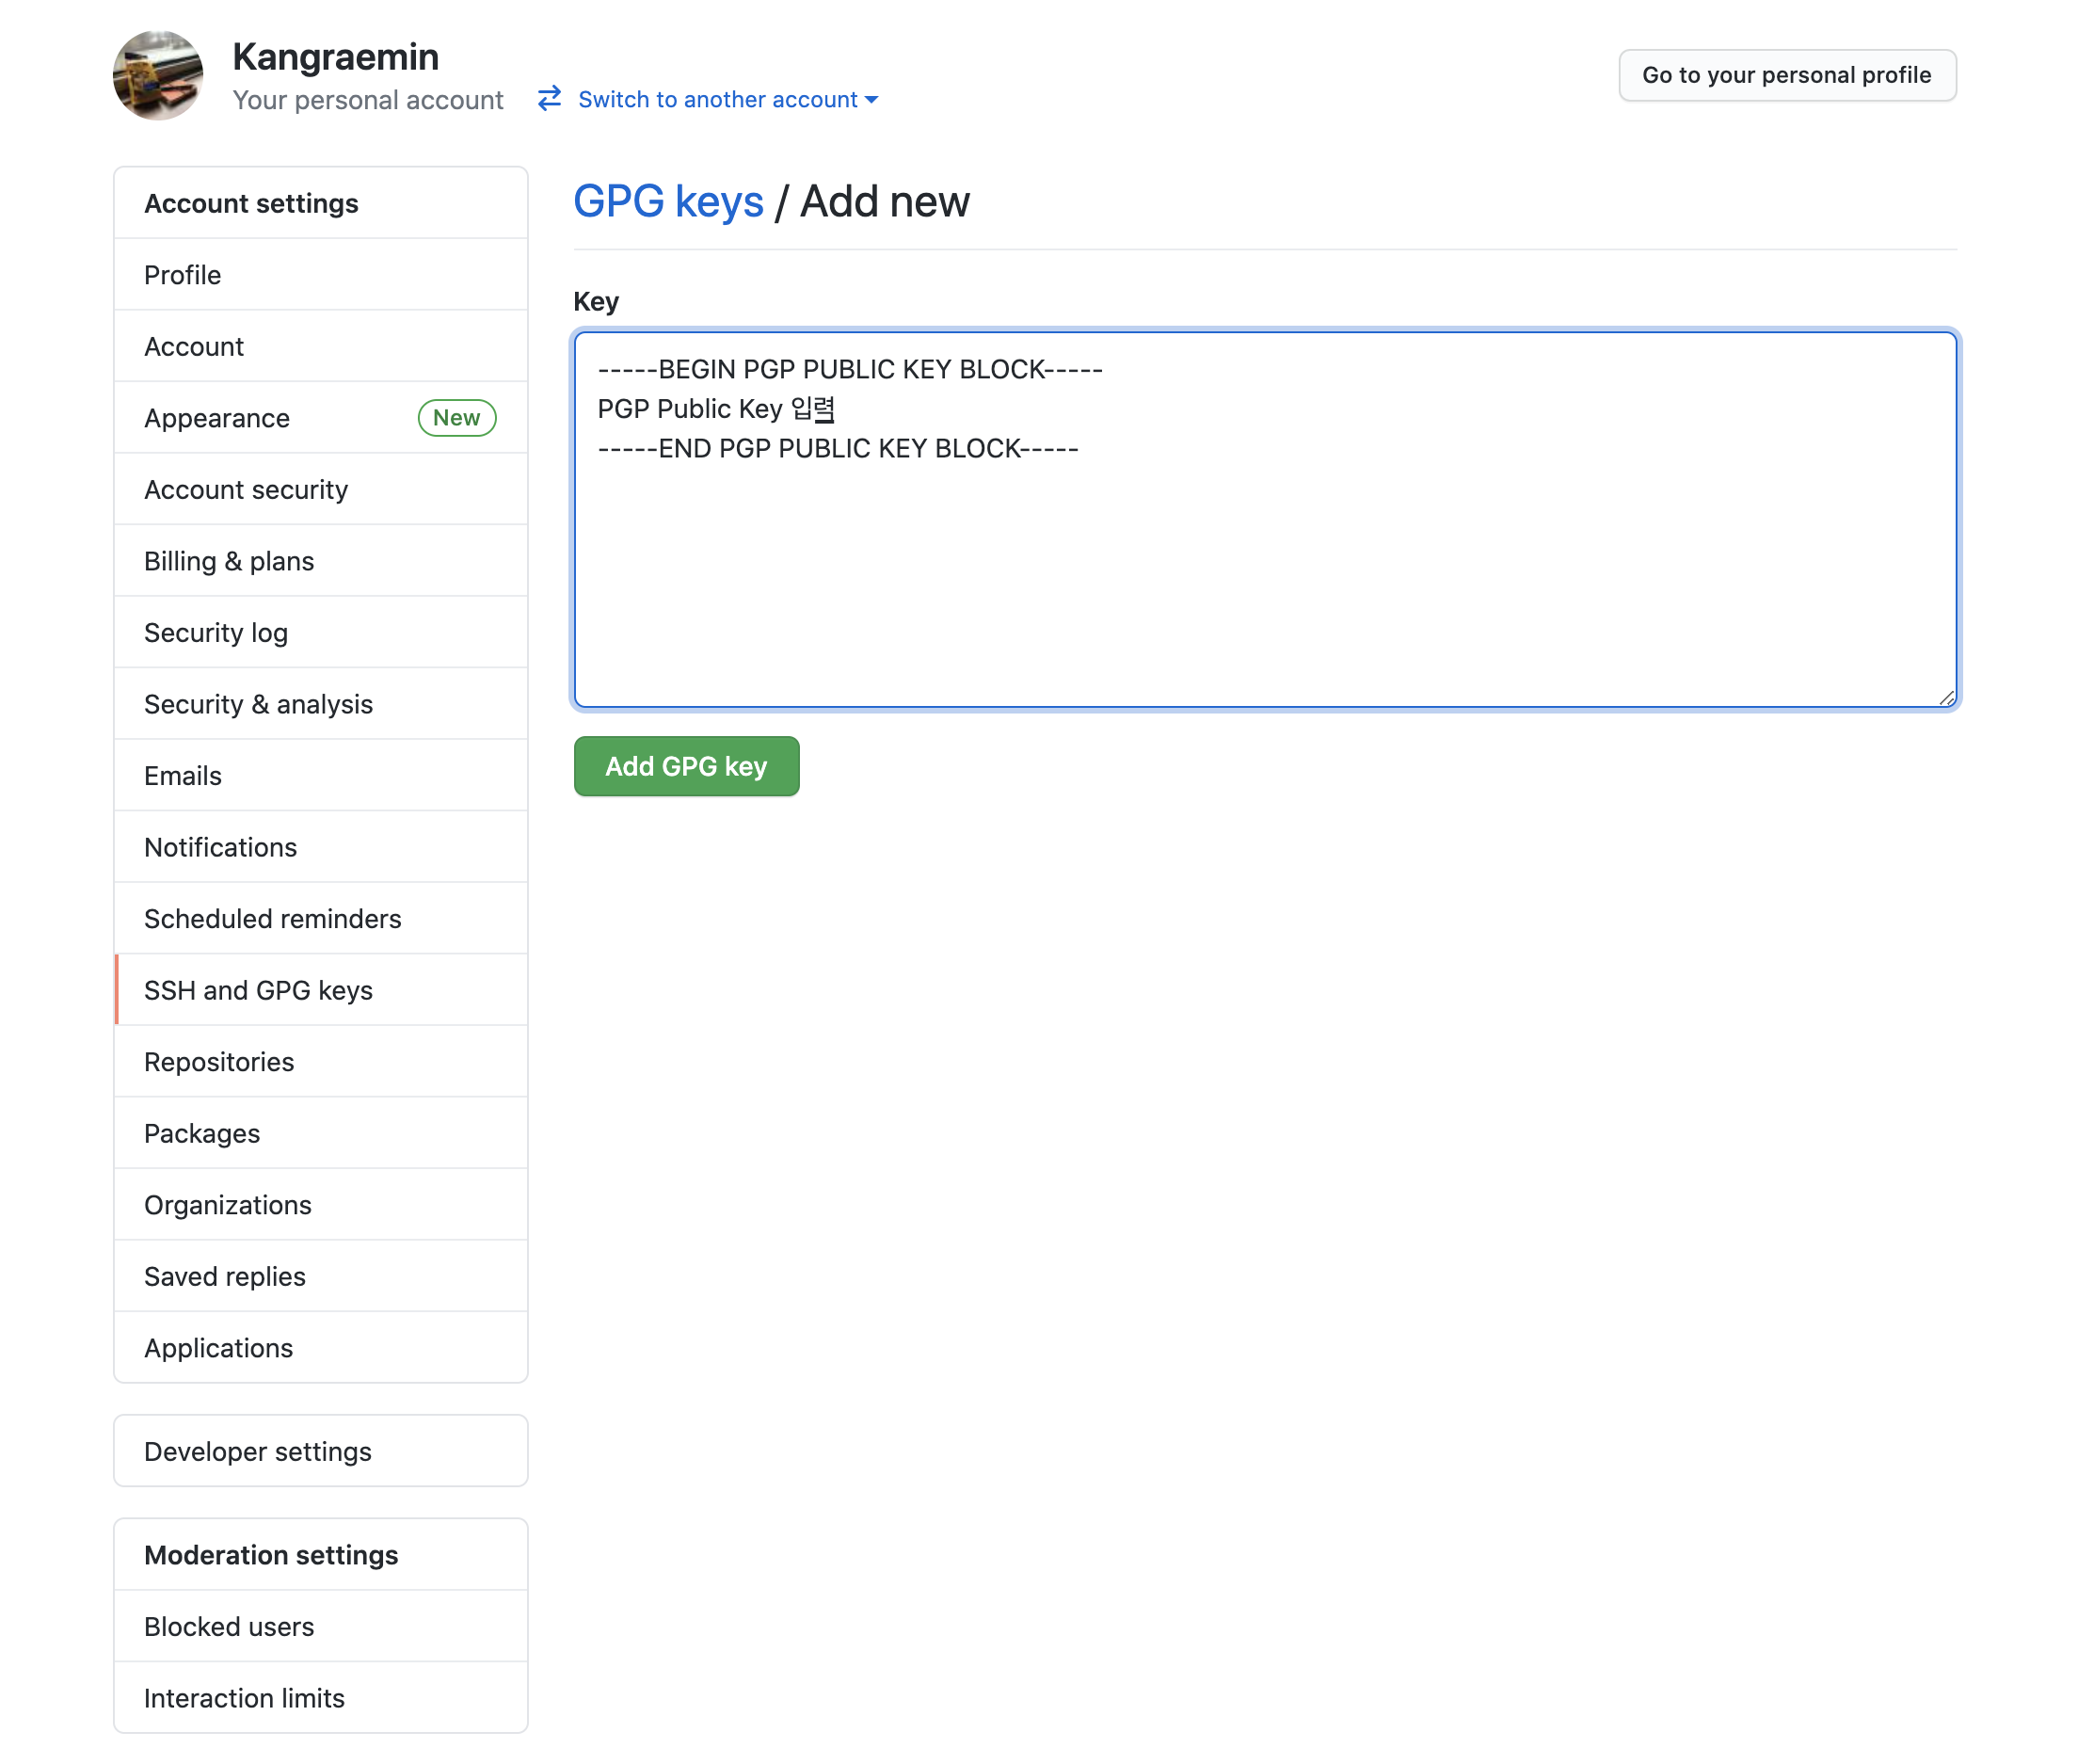
gpg --armor --export GPG_key_ID 명령어를 통해 생성된 public key 등록 합니다.
GPG Settings for gpg signing
user config에 signing key를 추가 해 줍니다.( 위의 766E06F1431AC0B0 값 사용 )
1 | |
본인이 관리하고 있는 모든 저장소에 gpg 사인이 가능하기를 원한다면 아래와 같이 설정 해 줍니다.
1 | |
만약 특정 저장소만 gpg 사인을 하고싶다면 해당 repo로 가서 아래의 명령어를 입력 해 줍니다.
1 | |
위와 같이 설정 후 커밋을 할 때, -S 키워드를 붙여 commit에 sign 해 줍니다.
1 | |
이후 push 해 주면, 아래와 같이 commit이 서명 된 것을 확인 할 수 있습니다.
Error handling
-S 를 붙여 커밋에 서명을 할 때, 아래와 같은 에러가 발생 할 수 있습니다.
1 | |
gnupg2를 활용하고 있다면, 아래의 명령어를 입력 후 비밀번호를 입력하면 문제가 해결됩니다. ( 출처 : stack overflow )
1 | |
SourceTree
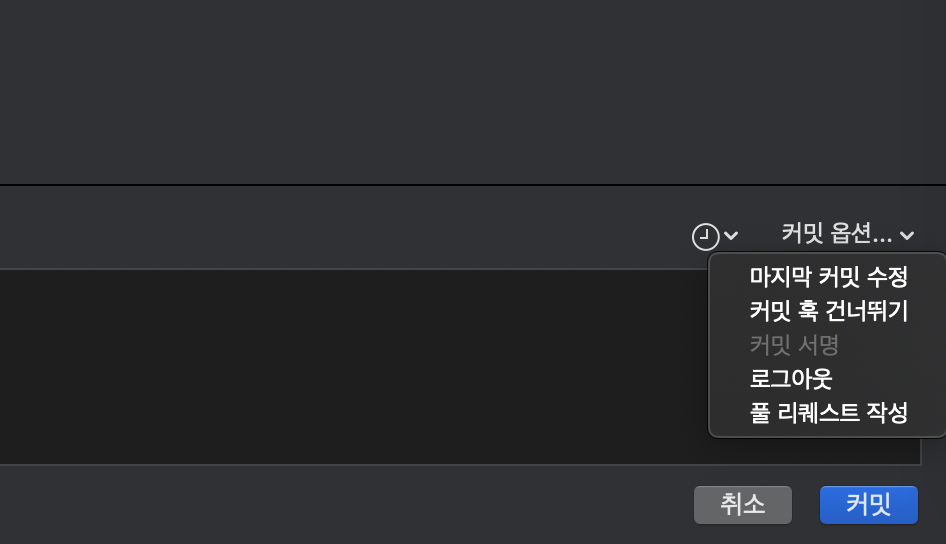
커밋 서명이 가능한지 확인
소스트리 하단의 아래쪽 부분에서, 커밋 옵션 부분의 커밋 서명 이 활성화 되어 있는지 확인 해 줍니다.
활성화 되어 있다면, 활성화 시킨 뒤 commit / push 해주시면 서명된 커밋이 push 됩니다.
Source tree에서 커밋 서명 활성화 하기
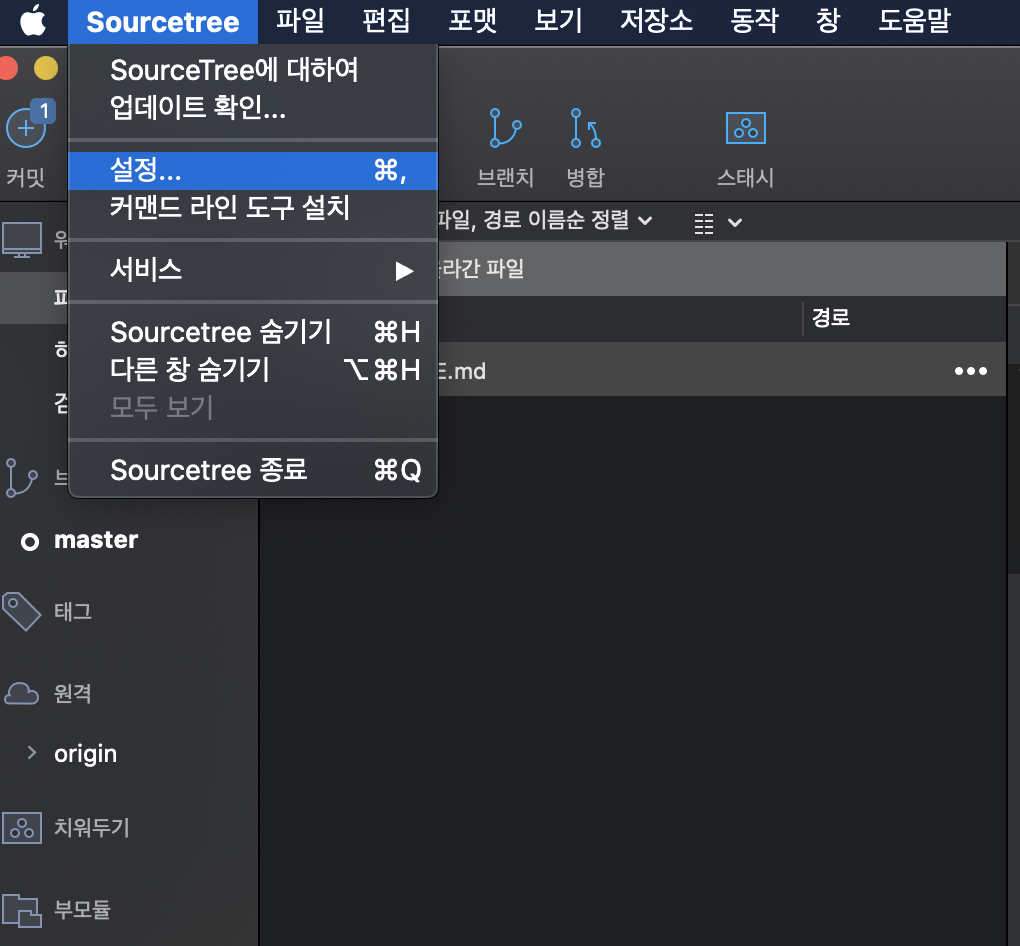
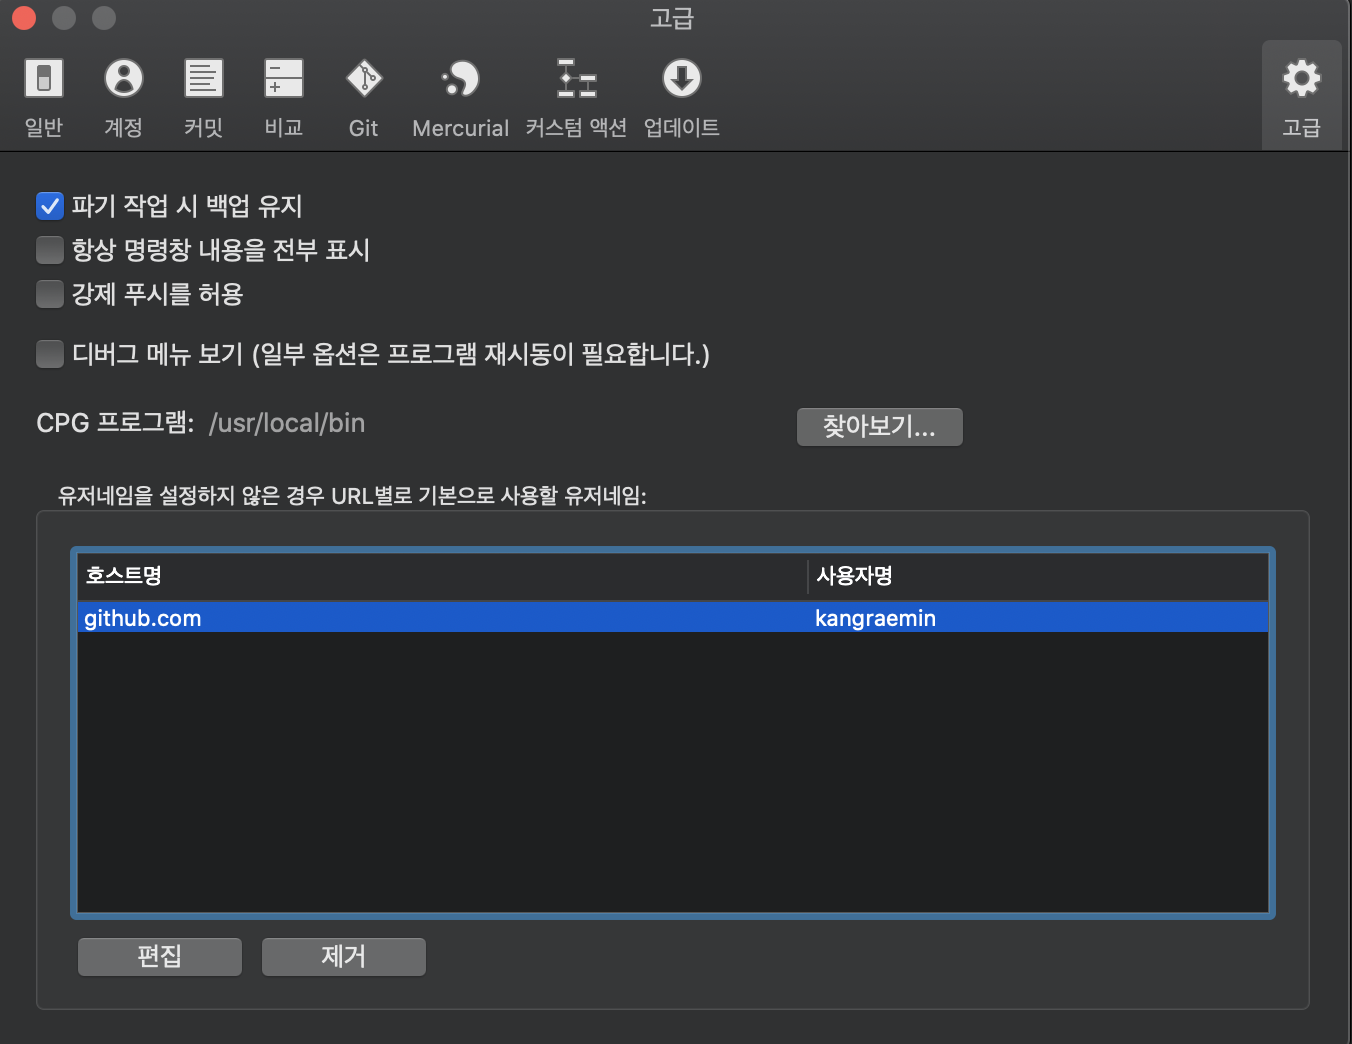
커밋 셔명이 활성화 되어 있지 않다면 SourceTree 설정 - 고급 항목으로 이동 해 줍니다.
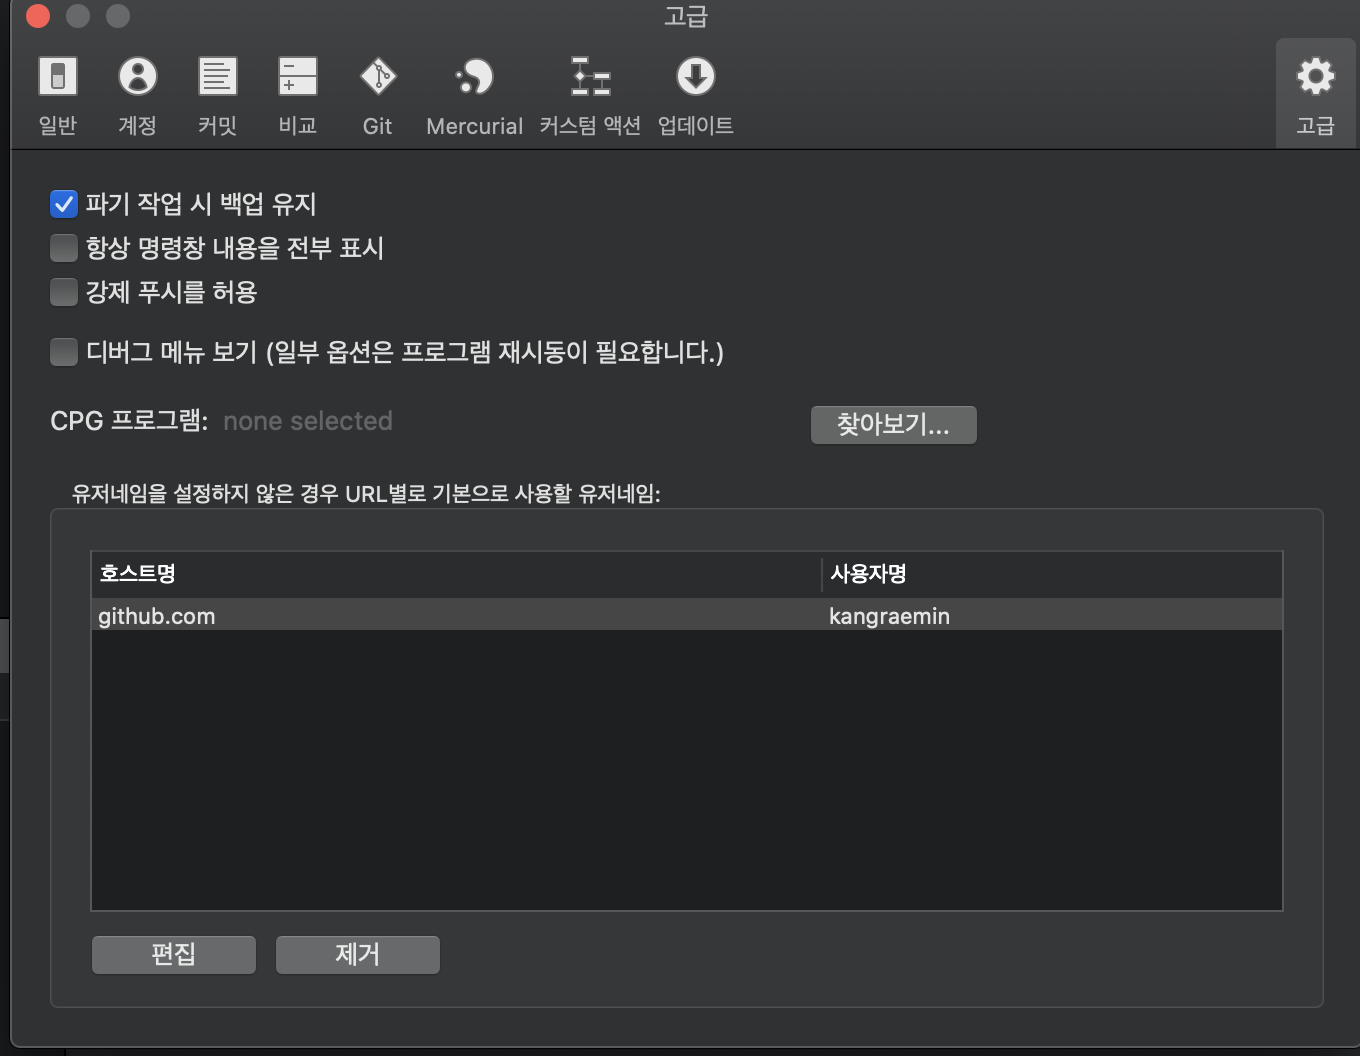
위 사진의 CPG 프로그램의 찾아보기를 클릭합니다. (CPG 프로그램 이라고 되어 있는데, sourcetree의 설정을 영어로 설정한 뒤 들어가보면 GPG program 으로 되어있는것으로 보아 번역상의 오타인것 같습니다. )
만일 brew를 통해 설치 하셨을 경우, /usr/local/bin 에 gpg 파일이 존재하더라도 아래와 같은 올바르지 않은 GPG경로 에러가 뜰 수 있습니다.
1 | |
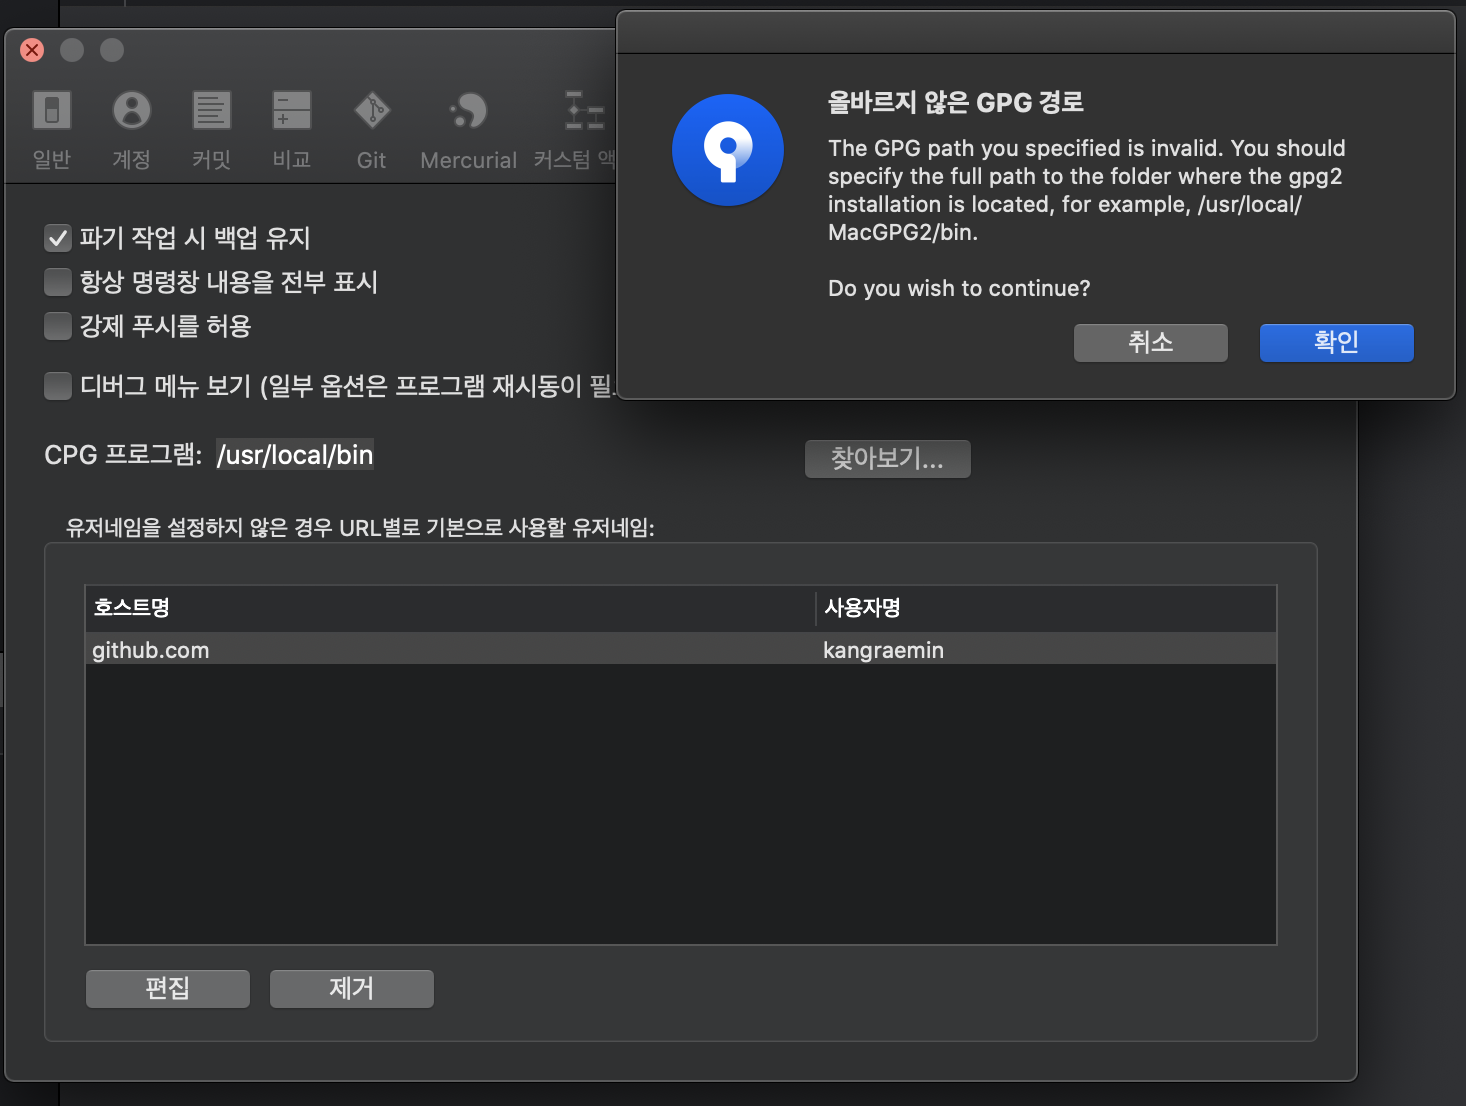
이때엔, /usr/local/Cellar/gnupg/2.2.27/bin 을 경로로 설정 ( 2.2.27은 gpg 의 버전 으로 변경 해주시면 됩니다 ) 해 주어야 하는데, 해당 위치로 설정 해 주어도 에러가 해결되지 않을 수 있습니다.
이때엔 아래의 명령어를 통해 symlink를 생성해 줍니다.
1 | |
그 뒤, 경로를 /usr/local/bin 로 설정 해 주시면 설정이 완료됩니다.
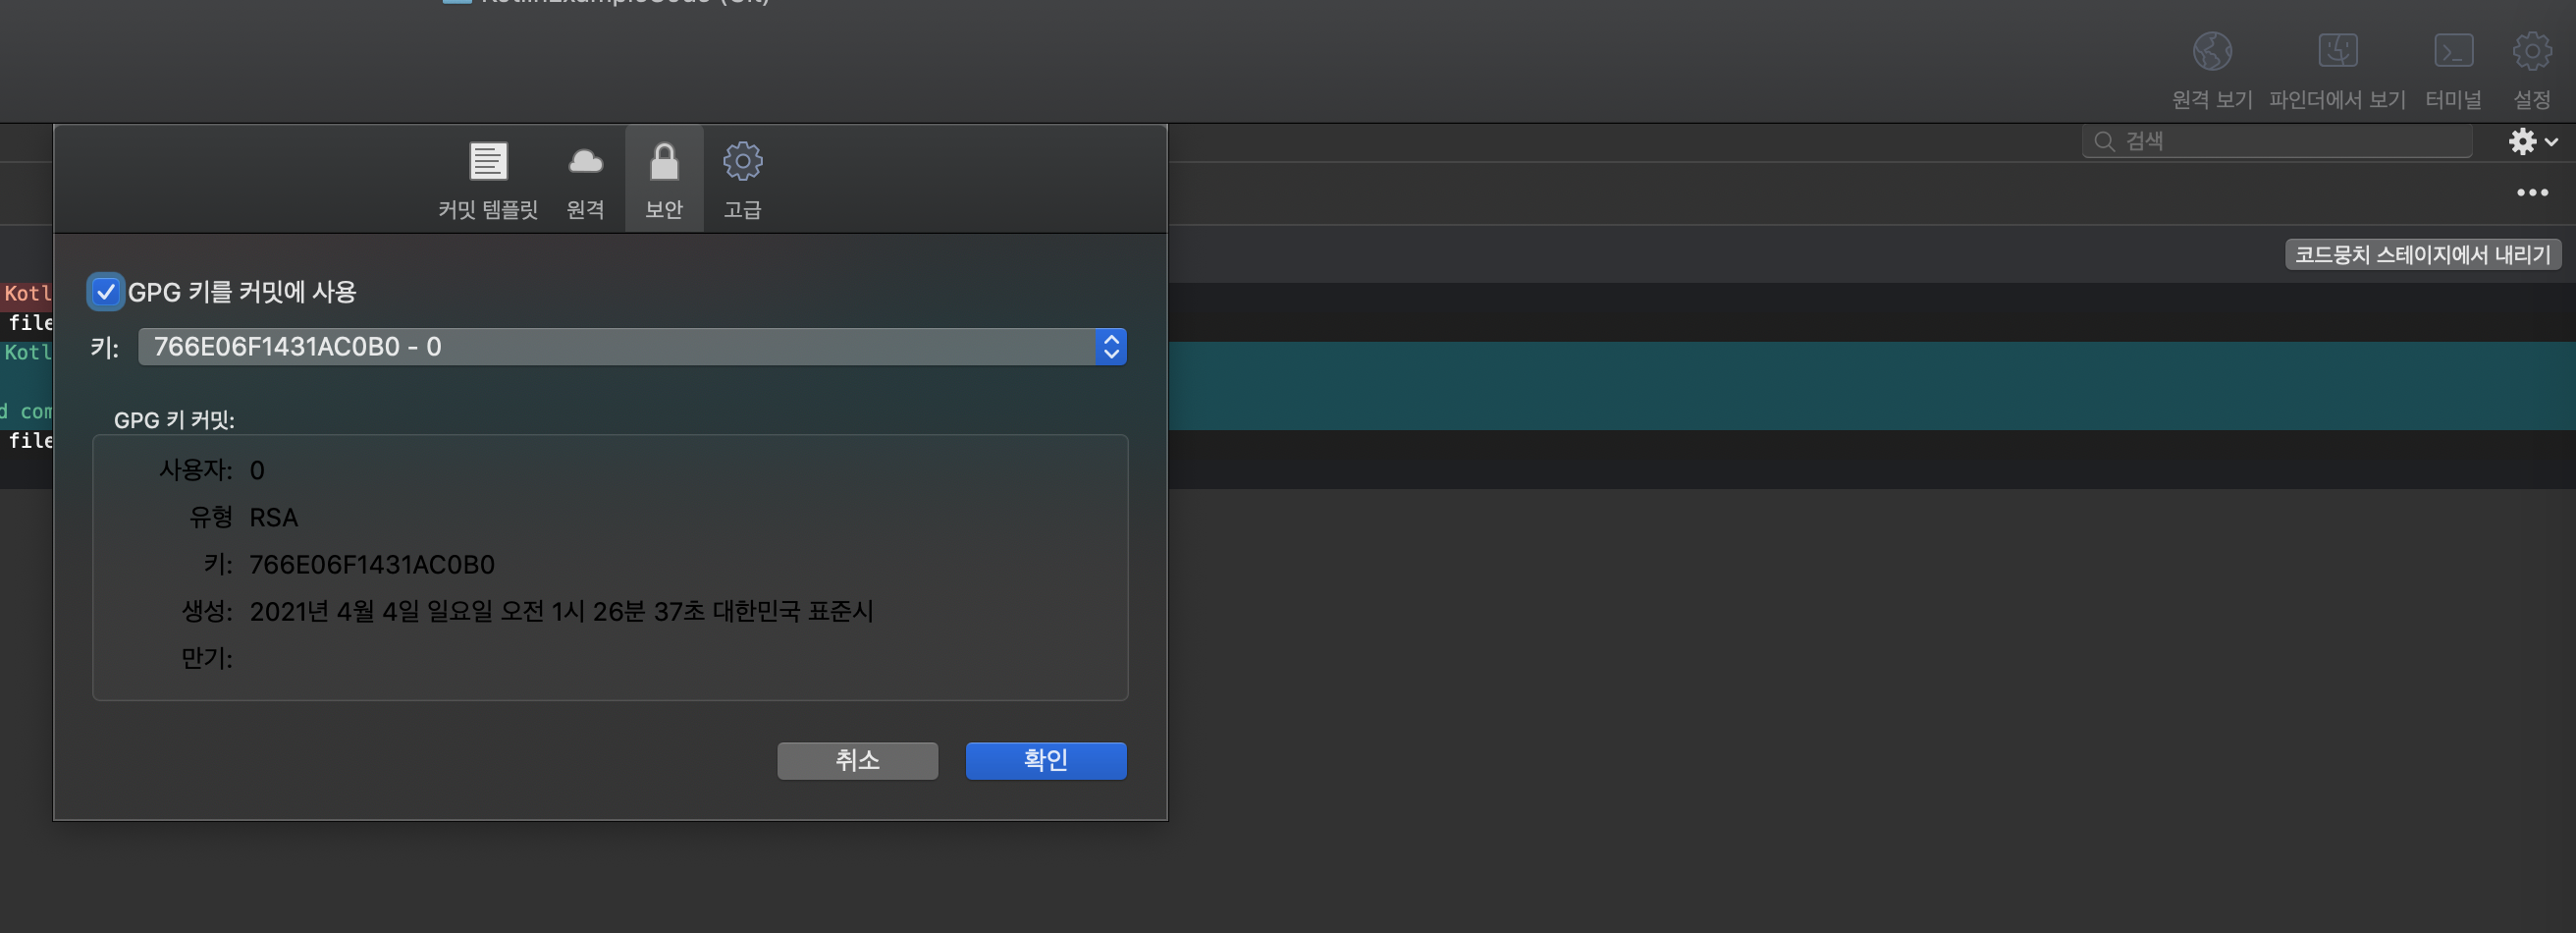
그 뒤에, 저장소의 repo 설정으로 가서, 보안 탭에서 gpg 키를 커밋에 사용 항목을 활성화 해 준뒤, 서명에 사용할 키를 선택 해 줍니다.
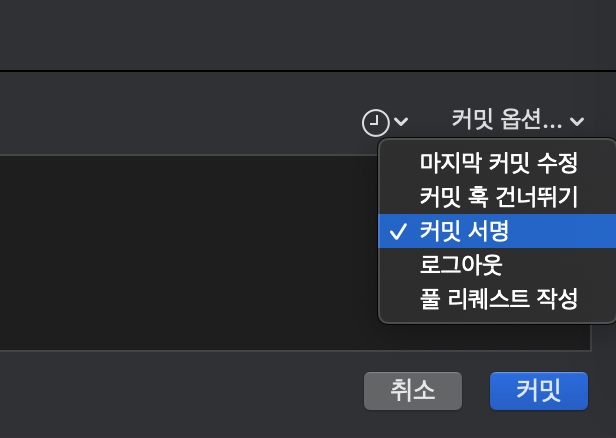
커밋 옵션에서 커밋 서명 항목을 활성화 해 줍니다.
이때, 아래와 같은 error: gpg failed to sign the data 에러가 뜰 수 있습니다.
1 | |
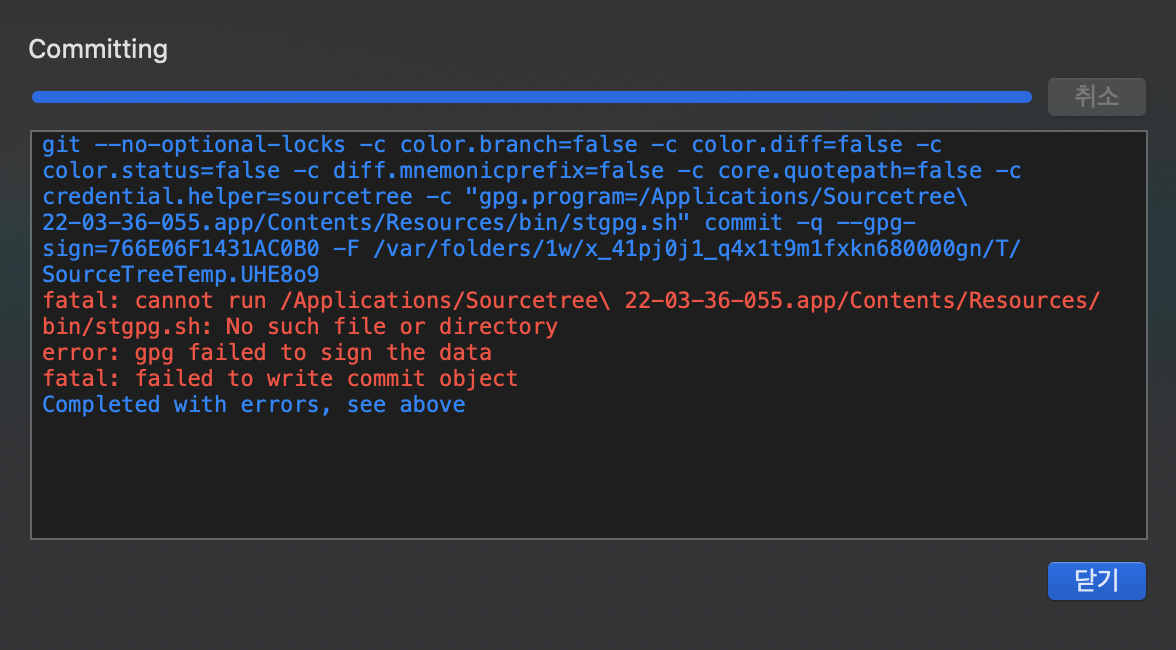
이때엔, GPG Suite tool ( link : https://gpgtools.org/ ) 을 설치 해 준 뒤 재시도 해봅니다. ( 출처 : atlassianDocs )
여전히 문제가 해결되지 않았다면, 여전히 stgpg.sh 파일을 찾지 못하고 있다는 의미이므로 SourceTree application의 이름을 변경 해 줍니다.
위 경우엔, source tree 앱의 이름이 Sourcetree\ 22-03-36-055.app 이라고 적혀 있는데, 공백을 모두 없애거나 Sourcetree 로 변경 해 줍니다.
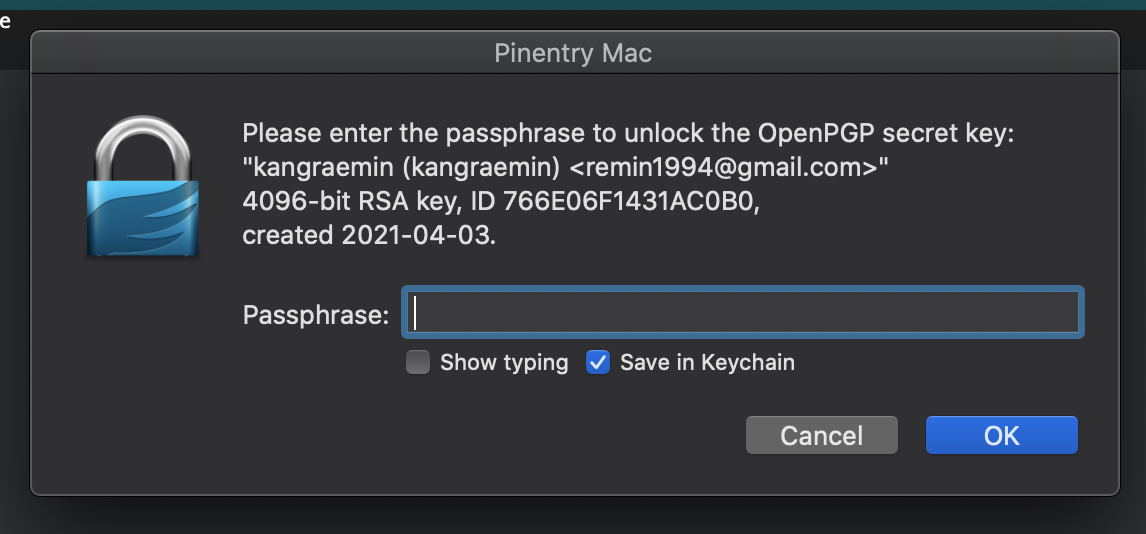
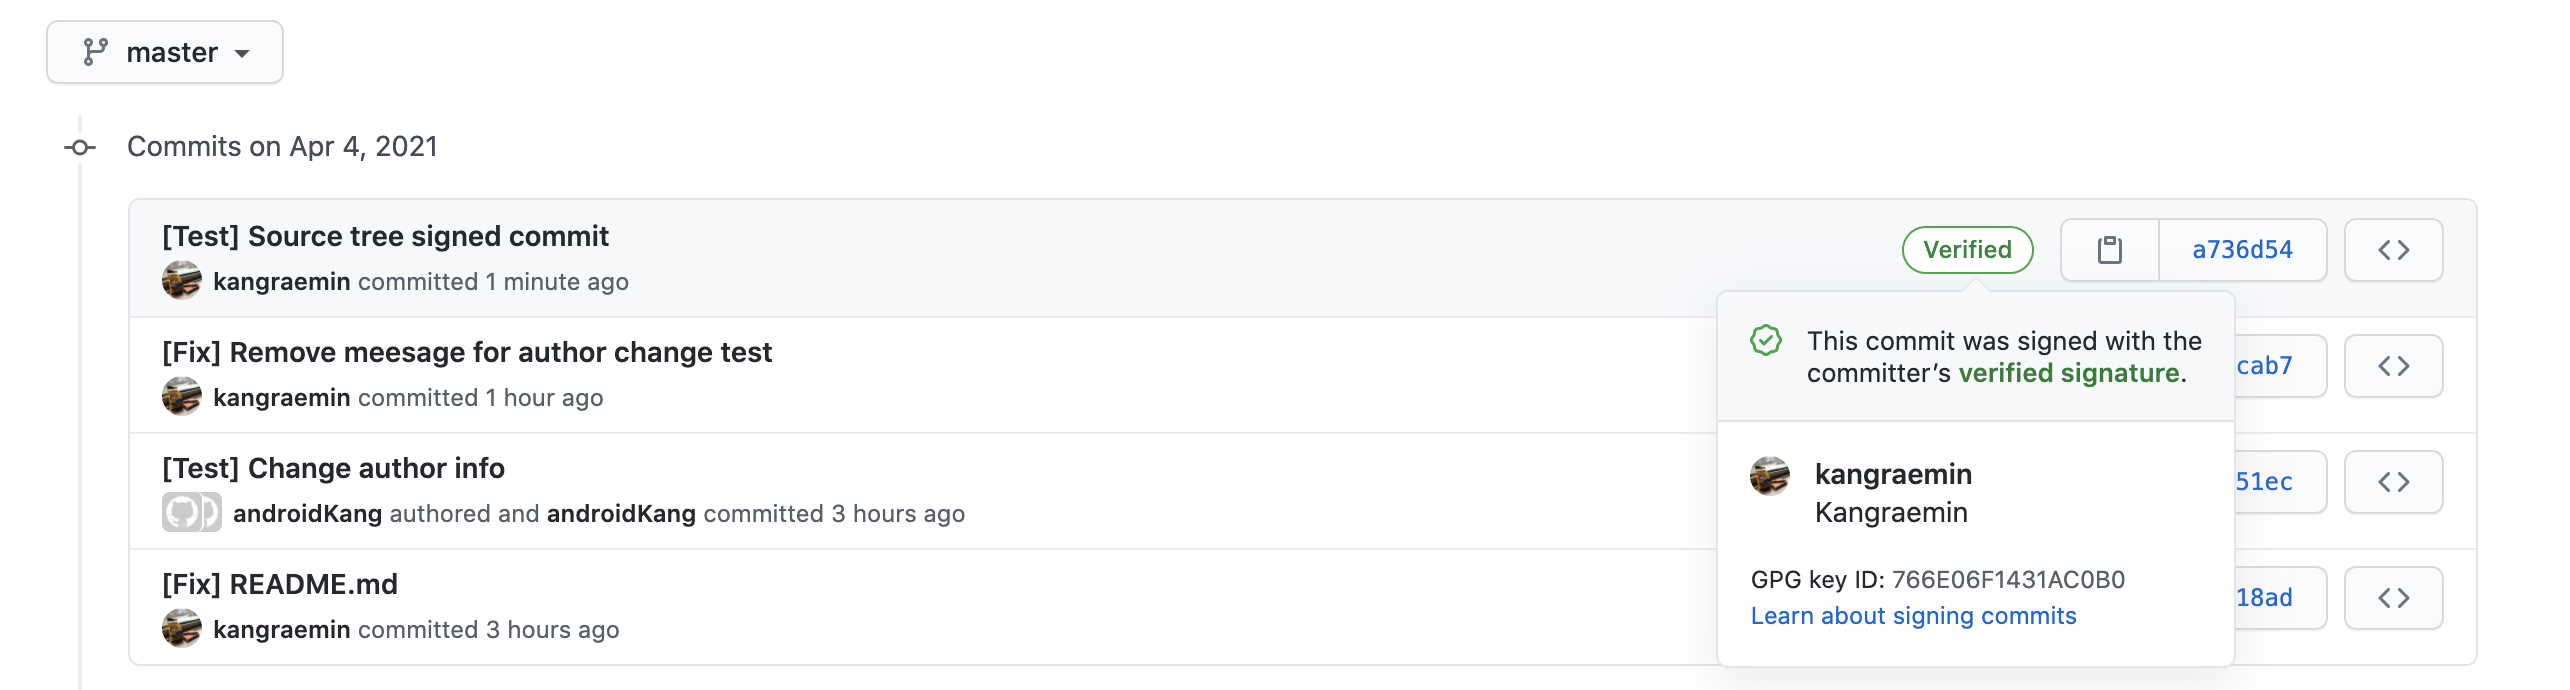
그 이후 커밋 시 아래와 같이 gpgTools가 실행되는 모습을 볼 수 있습니다. 비밀번호를 입력 한 후에 push를 진행하면, 아래와 같이 제대로 signed commit이 생성 된 것을 확인 할 수 있습니다.
GitKraken
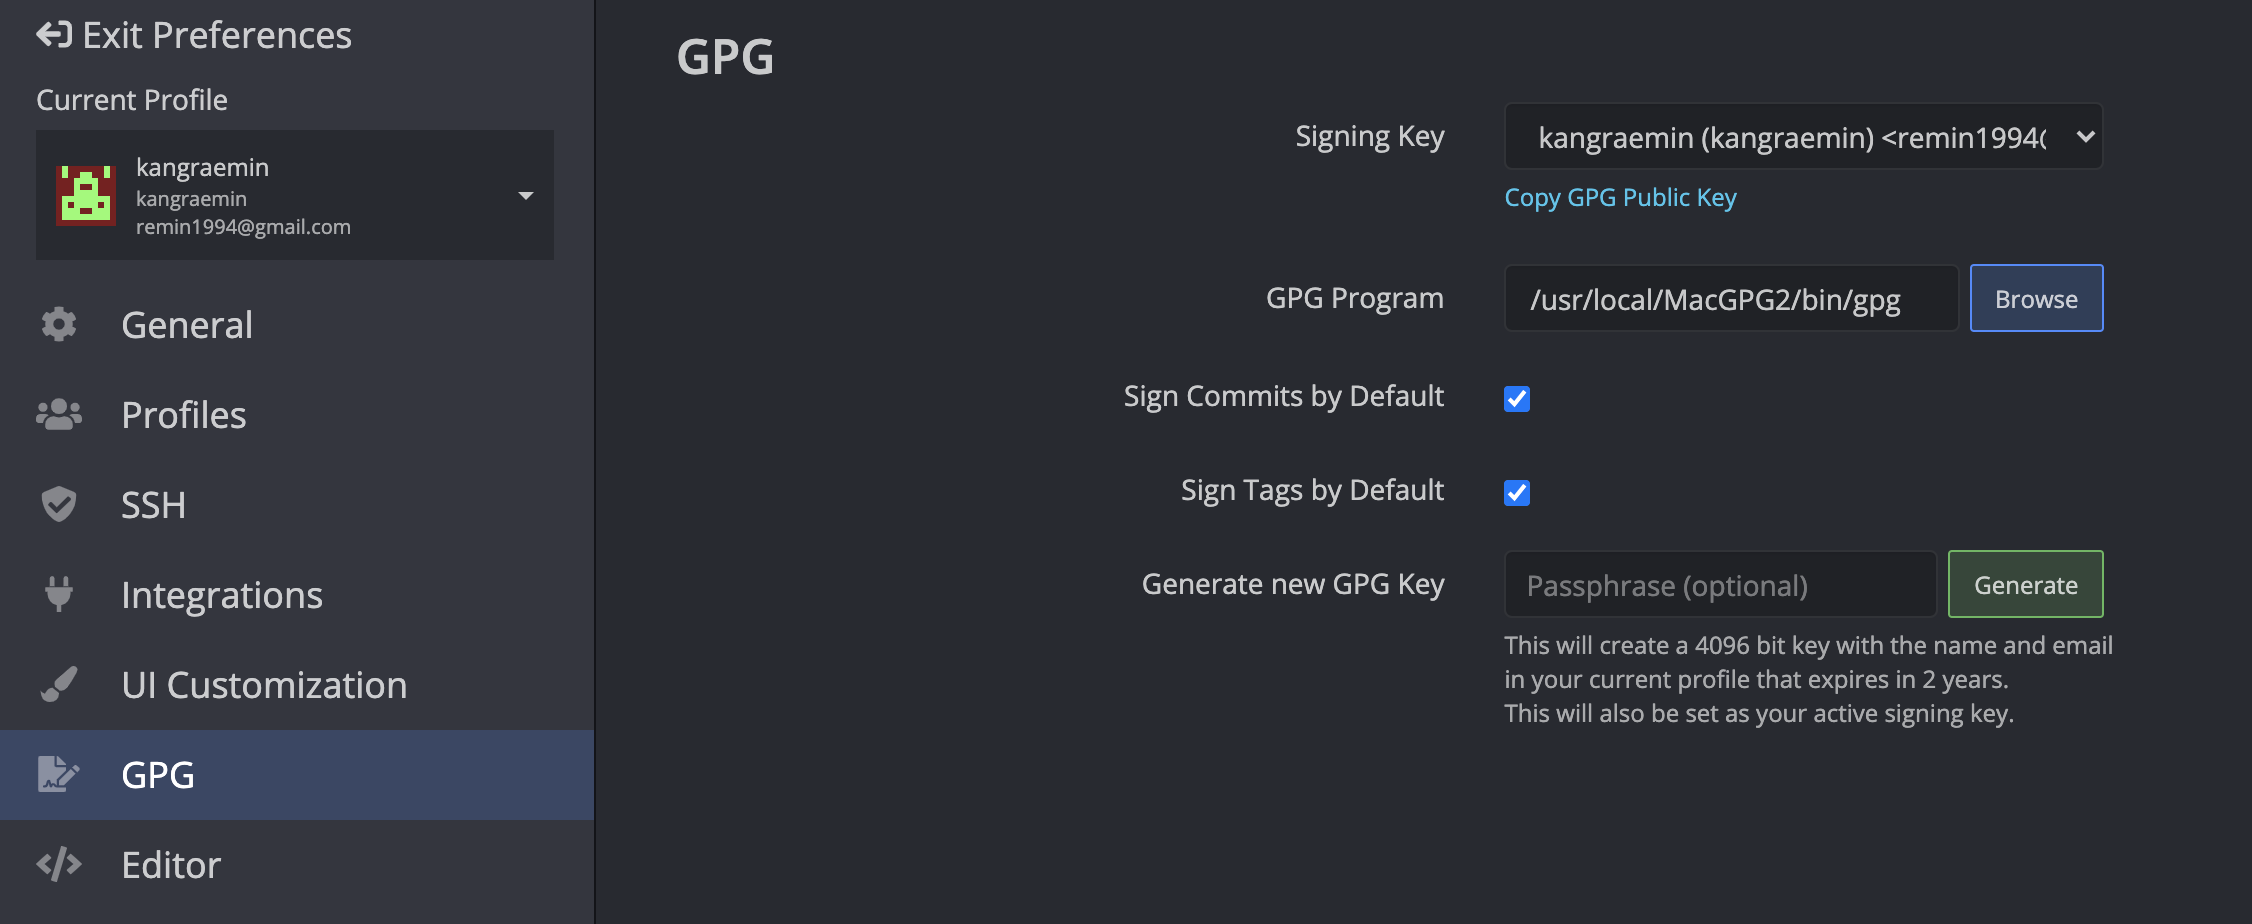
GitKraken의 설정 - GPG 설정으로 들어갑니다.
그 뒤, GPG 프로그램을 찾아 준 뒤 ( 해당 포스팅을 따라왔다면 gpg2 프로그램 사용 ), signing key를 아래와 같이 설정 해 줍니다.
그 뒤, commit / push를 진행하면 아래와 같이 signed commit이 생성 된 것을 확인 할 수 있습니다.
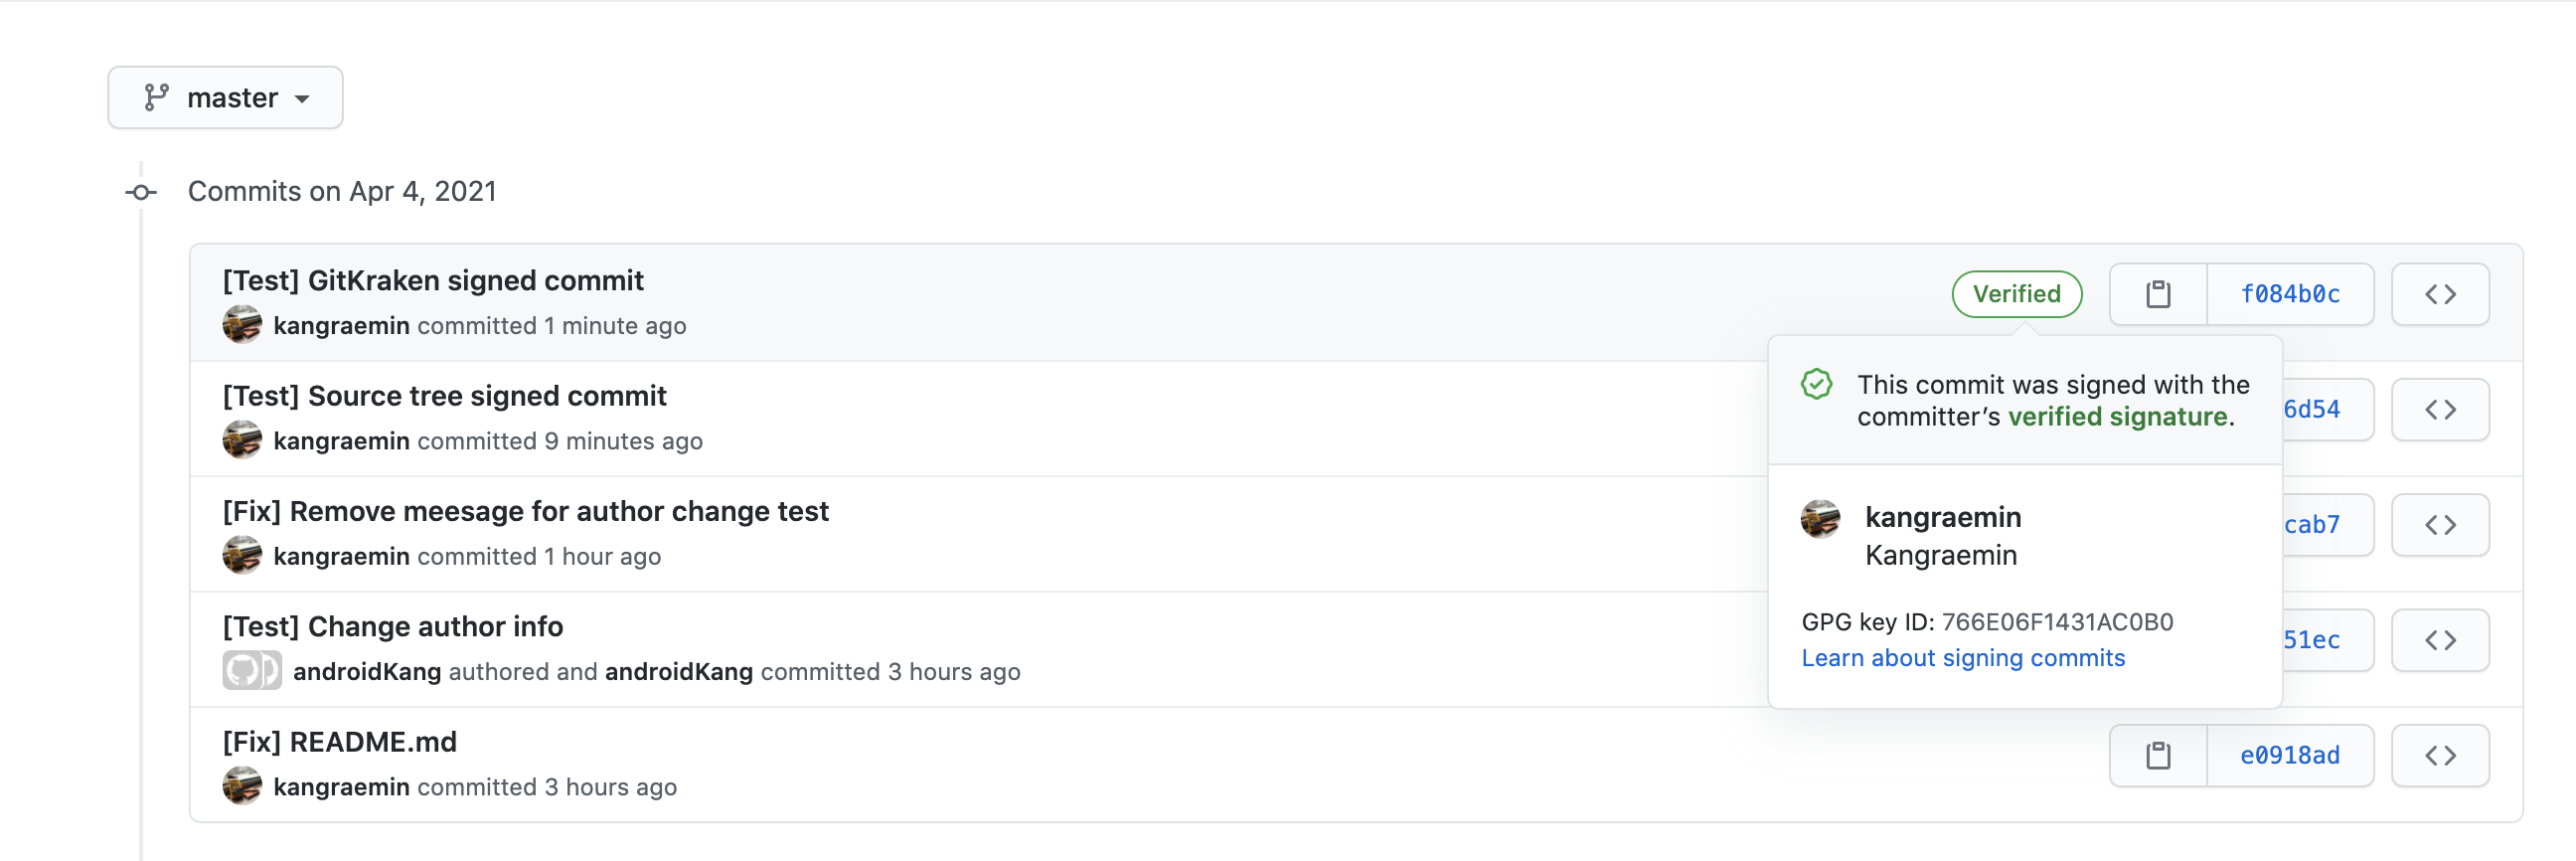
출처 : GitKraken Docs
"Git" 카테고리의 최근 포스팅
카테고리 모든 글 보기| Github verified commit - sourcetree, GitKraken 활용하기 | 2021. 04. 04 |
|---|